Weekly Article News #36

The recommended articles the author has read this week.
This letter is posted every Monday.

PyTorch 2.0

Big news! There was an announcement of the future release of PyTorch 2.0. The first stable version will be released in early March 2023.

Surprisingly, PyTorch 2.0 is backward compatible with PyTorch 1.0. This is because the features of PyTorch 2.0 are new additive features. One of the crucial features is torch.compile. This function accelerates the performance of PyTorch, especially in GPU calculations.

The author can’t wait for it to be released!

Algorithms #2 – Is a Prime Number?

The algorithm is necessary for a coding interview for a data scientist and a software engineering job. This article’s topic is one of the most important subjects.

Problem

Write a function to judge if a number is prime, where a prime number is a natural number greater than or equal to 2, whose positive divisor is 1 and itself. The function returns True if the number is prime, or returns False otherwise.

Solution

This solution is a simple approach without any specific mathematical knowledges. The approach consists three steps as follows.

  1. Check the special case.
    From the definition of a prime number, 1 is NOT a prime number. And, 2 is the only prime number among even numbers.
  2. An even number is NOT a prime number.
  3. Judge against odd numbers.
    In turn, we will check the condition if a number exists whose remainder is zero, it is not a prime number. Note that, using prior knowledge that the number is not even, it is sufficient to examine only odd numbers.
def is_prime(num):
    # check the special case,
    # 1 is NOT a prime number,
    # the only prime number 2 in even numbers.
    if num <= 1:
        return False
    elif num == 2:
        return True
    
    # even number is a False case
    if num % 2 == 0:
        return False

    # Only checking on odd numbers is sufficient.
    for i in range(3, num, 2):
        if num % i == 0:
            return False
    return True

Test examples

nums = list(range(2, 15))
for n in nums:
    print(f"{n}: {is_prime(n)}")

>  2: True
>  3: True
>  4: False
>  5: True
>  6: False
>  7: True
>  8: False
>  9: False
>  10: False
>  11: True
>  12: False
>  13: True
>  14: False

As a comment, using mathematical knowledge of integers, it is also possible to implement a solution with a more efficient computational complexity.

Weekly Article News #35

The recommended articles the author has read this week.
This letter is posted every Monday.

This week, the author introduces the OSS for Astronomy, SunPy.

SunPy

Python library to access the data for solar physics. Therefore, we can easily visualize planet positions in the solar system by utilizing SunPy.

Recently, the author posted an article on how to use SunPy to visualize planet positions. Just a quick glance, when you have an interest.
Article Link

SunPy – Planet Positions in the Solar System

SunPy is a useful python library to access solar physics data. Therefore, we can easily visualize planet positions in the solar system by utilizing SunPy.

In this post, we will quickly see how to visualize the orbits of specified planets in a specified time series.

This post assumes the use of a Jupyter notebook.

The full code link of Google Colab

Install SunPy and Astropy

Before analysis, we have to install SunPy if you did not install it yet. We can easily install it with a pip command. If you use an anaconda environment, please use conda commands.

$ pip install sunpy

In this post, the version of SunPy is 3.1.8.

In addition to SunPy, we use data structures of Astoropy, a common-core python package for Astronomy.

$ pip install astropy

In this post, the version of Astropy is 4.3.1.

Import libraries

First, we import the necessary libraries.

import matplotlib.pyplot as plt
import numpy as np
import pandas as pd

from astropy.coordinates import SkyCoord
from astropy.time import Time
from sunpy.coordinates import get_body_heliographic_stonyhurst

Quick Try

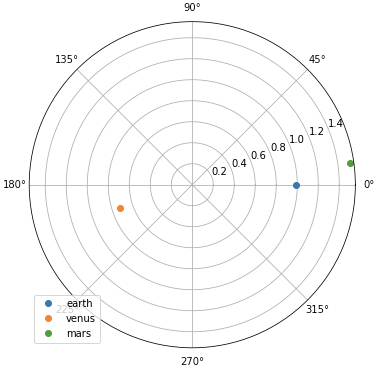
Let’s try SunPy with a quick view. We have to specify the planets and the time series as the “Time” type of Astropy. Then, we can get each coordinate by using the function “get_body_heliographic_stonyhurst()” of SunPy.

Note that the coordinate system is NOT the cartesian coordinate. We can get them as latitude, longitude, and radius. And, the units are degree and AU. Au is the distance unit, where 1 AU is the distance between Earth and Sun().

obstime = Time('2022-11-22T07:54:00.005')
planet_list = ['earth', 'venus', 'mars']
planet_coord = [get_body_heliographic_stonyhurst(this_planet, time=obstime) for this_planet in planet_list]

We can visualize them as follows.

fig = plt.figure(figsize=(6, 6))
ax1 = plt.subplot(1, 1, 1, projection='polar')
for this_planet, this_coord in zip(planet_list, planet_coord):
    plt.plot(np.deg2rad(this_coord.lon), this_coord.radius, 'o', label=this_planet)
plt.legend(loc='lower left')
plt.show()

Obtain the Orbit Information of the Planets in the Solar System

We will prepare the practical functions to visualize the orbits of specified planets in a specified time series.

First, we define a function to get a list of coordinate information instances for a specified planet at a specified time.

def get_planet_coord_list(timestamp, planet_list):
    """
    Get a list of coordinate information instances 
    for a specified planet at a specified time
    """
    # convert into the Time type of astropy
    timestamp = Time(timestamp)
    
    # get a coordinate of a specified planet
    planet_coord_list = [get_body_heliographic_stonyhurst(_planet, time=timestamp) for _planet in planet_list]

    return planet_coord_list

Second, we define a function to get coordinates of specified time and planets. In this function, we use the function get_planet_coord_list() defined above.

def get_planet_coord(timestamp, planet_list):
    """
    Get coordinates of specified time and planet

    Return: dict
        key(str): planet name
        value(dict): latitude(deg), longitude(deg), radius(AU)
            key: 'lon', 'lat', 'radius'
    """
    # a list of coordinate information instances
    # for a specified planet at a specified time
    _planet_coord_list = get_planet_coord_list(timestamp, planet_list)

    dict_planet_coord = {}
    for _planet, _coord in zip(planet_list, _planet_coord_list):
        # latitude(deg), longitude(deg), radius(AU)
        lon, lat, radius = _coord.lon, _coord.lat, _coord.radius
        # dict_planet_coord[_planet] = [lon, lat, radius]
        dict_planet_coord[_planet] = {'lon':lon, 'lat':lat, 'radius':radius}
    
    return dict_planet_coord

Third, we define a function to get the coordinates of a specified planet in a specified time series. By obtaining the coordinates for the time series, we can plot the orbit at the specified period. And, in this function, we use the function get_planet_coord() defined above.

def get_planet_coord_timeseries(timeseries, planet_list):
    """
    Get coordinates of a specified planet in a specified time series
    """
    # initialization
    dict_planet_coord_timeseries = {}
    for _planet in planet_list:
        dict_planet_coord_timeseries[_planet] = {'lon':[], 'lat':[], 'radius':[]}
    
    # Obtain coordinates of each planet in time series
    for _timestamp in timeseries:
        """
        Coordinates of the specified planet at the specified time
        
        key(str): planet name
        value(dict): latitude(deg), longitude(deg), radius(AU)
            key: 'lon', 'lat', 'radius'
        """
        dict_planet_coord = get_planet_coord(_timestamp, planet_list)
        for _planet in planet_list:
            for _key in ['lon', 'lat', 'radius']:
                dict_planet_coord_timeseries[_planet][_key].append(np.array(dict_planet_coord[_planet][_key]))

    # Convert list into ndarray
    for _planet in planet_list:
        for _key in ['lon', 'lat', 'radius']:
            dict_planet_coord_timeseries[_planet][_key] = np.array(dict_planet_coord_timeseries[_planet][_key])
    
    return dict_planet_coord_timeseries

Now all information on planetary orbits can be obtained. Now let’s actually plot the orbits of the planets.

Visualization of the Orbits of the Planets in the Solar System

To visualize the planetary orbits more easily, we will define the plot function. The argument of this function is the return of the function get_planet_coord_timeseries() define above.

def plot_planet_position(dict_planet_coord_timeseries):
    fig = plt.figure(figsize=(8, 8))
    ax = plt.subplot(1, 1, 1, projection='polar')
    for _planet in dict_planet_coord_timeseries.keys():
        # longitude(deg), radius(AU)
        lon = np.deg2rad(dict_planet_coord_timeseries[_planet]['lon'])
        radius = dict_planet_coord_timeseries[_planet]['radius']
        # plot
        plt.plot(lon, radius, label=_planet, linewidth=2)
        plt.scatter(lon[0], radius[0], color='black', s=40)  # initial point
        plt.scatter(lon[-1], radius[-1], color='red', s=40)  # final point
    plt.legend()
    plt.show()
    plt.close(fig)

Then, let’s plot the orbits!

Using the functions you have defined so far, you can easily draw orbits for a given planet and period of time. The information to be pre-specified is the period of the target data (start and end) and the planets of the solar system.

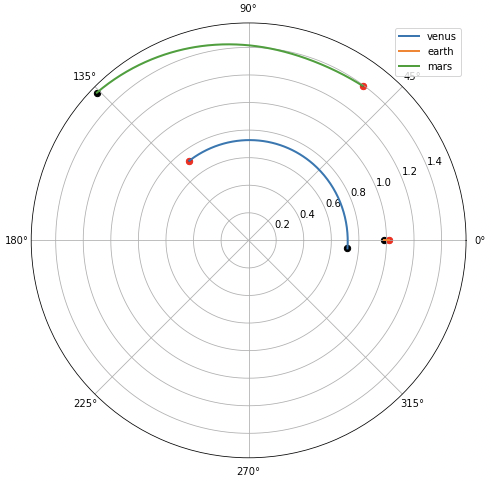
First, let’s specify a near-Earth planet. Set the period appropriately. The author encourages readers to try changing it in various ways.

start, end = '2022-01-01', '2022-08-01'
planet_list = ['venus', 'earth', 'mars']

timeseries = pd.date_range(start, end, freq='D')
dict_planet_coord_timeseries = get_planet_coord_timeseries(timeseries, planet_list)
plot_planet_position(dict_planet_coord_timeseries)

Note that the graph is in a coordinate system with the earth as the stationary system in the angular direction. Therefore, the position of the earth appears to be motionless, except in the radial direction. The change of the earth in the radial direction is due to the fact that the Earth’s orbit is not strictly circular, but elliptical.

Next, we will include planets far from Earth.

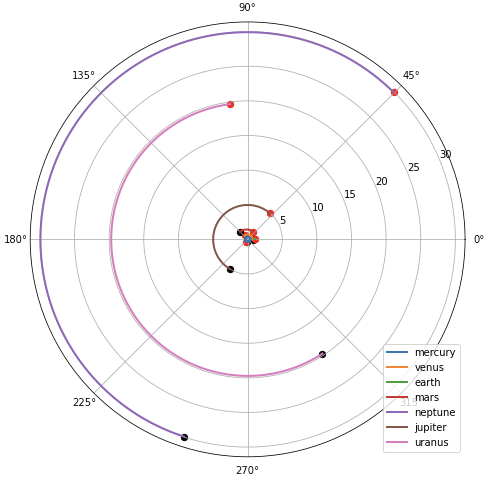
planet_list = ['mercury', 'venus', 'earth', 'mars', 'neptune', 'jupiter', 'uranus']
dict_planet_coord_timeseries = get_planet_coord_timeseries(timeseries, planet_list)

plot_planet_position(dict_planet_coord_timeseries)

Planetary orbits around the Earth can be seen to be quite dense. In this way, the structure of the solar system can be visually confirmed.

Summary

We have seen how to visualize the orbits of specified planets in a specified time series by SunPy. With SunPy, any Python user can check the orbits of the planets of the solar system.

The author hopes this blog helps readers a little.

Algorithms #1 – Two Sum Function

The algorithm is necessary for a coding interview for a data scientist and a software engineering job. This article’s topic is one of the most important subjects.

Problem

Write a function to return True if there exists a pair of numbers whose summation equals the given target number, or to return False otherwise. You may assume that an element in a list is an integer.

Solution – Normal Approach

This solution is a simple approach, but not a computationally efficient method. Time Complexity is $O(N^2)$.

The method examines all the sums of two list elements in sequence to determine if they contain the desired result.

def two_sum(nums, target):
    """
    Time Complexity O(N^2)

    Args:
        nums(list): a list of an integer number
        target(int): target-integer number
    """
    for i in range(len(nums)):
        for j in range(len(nums)):
            if i != j and target == nums[i] + nums[j]:
                return True
    return False

Test examples

assert two_sum([10, 2, 3, 1], 5) == True
assert two_sum([1, 2, 3, 4], 1) == False

Solution – Better Approach

This solution is an improved approach, then the Time Complexity is $O(N)$!

The key concept is as follows. First, we choose one element in each iteration. As a result, we can determine the desired element from the “target number – one element”. Second, we check whether the desired element exists in a cache, where the cache is a list containing elements examined in iterations already performed.

By repeating the above procedures, it is possible to determine whether a desired pair of elements is included in the list.

def two_sum(nums, target):
    """
    Time Complexity O(N)

    Args:
        nums(list): a list of an integer number
        target(int): target-integer number
    """
    cache = set()
    for n in nums:
        ans = target - n
        if ans in cache:
            return True
        else:
            cache.add(n)
    return False

Test examples

assert two_sum([10, 2, 3, 1], 5) == True
assert two_sum([1, 2, 3, 4], 1) == False

Appendix: The case that the indices of numbers are required

Problem

Write a function to return the indices of the two numbers whose summation equals the given target number, or to return False otherwise. You may assume that an element in a list is an integer.

Solution

In this case, we should use a hash map, i.e., the dictionary in Python. The concept of a solution is the same as above. However, we have to store the indices of each number.

def two_sum(nums, target):
    cache = {}
    for i, n in enumerate(nums):
        ans = target - n
        if ans in cache:
            return (cache[i], i)
        else:
            cache[n] = i
    return False

Test examples

assert two_sum([10, 2, 3, 1], 5) == (1, 2)
assert two_sum([1, 2, 3, 4], 1) == False

Weekly Article News #34

The recommended articles the author has read this week.
This letter is posted every Monday.

This week, the author introduces two practical OSS to perform Bayesian Optimization.

BoTorch

A python library for Bayesian Optimization accelerated by PyTorch. This OSS is worth to be paid attention although it is currently in beta and under active development.

Optuna

One of the most famous python libraries for Bayesian Optimization, developed by Preferred Networks, Inc. We can use it with flexibility, fast execution, and easy parallelization.

BayesianOptimization

This GitHub repository (a python library) is also educational and worth reading, where the algorithm is implemented based on the Gaussian Process.

Weekly Article News #33

The recommended articles the author has read this week.
This letter is posted every Monday.

This week, the author introduces two practical OSS to check the fairness of a machine learning model, e. g. a model is unwillingly biased toward certain information.

Themis ML

A python library to check the fairness. And, this library is built on top of pandas and scikit-learn, so it is expected user friendly.

AI Fairness 360 (AIF360)

A python and R library containing methods for checking fairness.

Weekly Article News #32

The recommended articles the author has read this week.
This letter is posted every Monday.

This week, the author introduces two practical OSS to validate the sensitivity of model prediction, e. g. how sensitive the output is to small changes in the input.

Foolbox

a python library to run fast adversarial attacks to benchmark the robustness of machine learning models in PyTorch, TensorFlow, and JAX.

CleverHans

a python library to implement adversarial attacks against machine learning models.

Weekly Article News #31

The recommended articles the author has read this week.
This letter is posted every Monday.

On writing clean Jupyter notebooks

Jupyter Notebook is an excellent tool for developers. However, there are some differences from the scripting method, so there are things you should know. This article introduces valuable things.

Introducing Snapshot Testing for Jupyter Notebooks

The wonderful OSS, nbsnashot, is a tool for testing a Jupyter Notebook. In the script style, we make test code, however, it is difficult in the notebook style. This OSS makes it possible and easy!

Weekly Article News #30

The recommended articles the author has read this week.
This letter is posted every Monday.

DeepSpeed

Excellent library, developed by Microsoft, for optimization of deep learning training and inference.

Top Explainable AI (XAI) Python Frameworks in 2022

XAI, Explainable AI, is one of the recent hot topics. In this article, 6 popular OSS have been introduced, i.e., SHAP, LIME, Shapash, ELI5, InterpretML, OmniXAI.