In this post, we will learn how to build a docker container for PyCaret.
We create a docker image from a Dockerfile. And, we will see how to build a docker container and run a jupyterlab.
Dockerfile
The entire contents of the Dockerfile are as follows.
FROM python:3.8

WORKDIR /opt
RUN pip install --upgrade pip
RUN pip install pycaret \
				jupyterlab
RUN pip install lux-api
RUN jupyter nbextension install --py luxwidget
RUN jupyter nbextension enable --py luxwidget
WORKDIR /work

CMD ["jupyter","lab","--ip=0.0.0.0","--allow-root","--LabApp.token=''"]
We create the docker image based on the python image, whose version is 3.8.
By the sentence “WORKDIR /opt”, we specify the directory for installing the python libraries.
And, we upgrade pip, to install the external python libraries in order. Here, we install pycaret and jupyterlab. Of course, you can also install other libraries.
Note that the last sentence ‘WORKDIR /work’ indicates that the current directory is set at ‘/work/’ after we enter the docker container.
Build a Dockerfile
Let’s create a docker image from the Dockerfile. Execute the following command in the directory where the Dockerfile exists.
$ docker build .
After building the docker image, you can confirm the result by the following command. Later, we will use the ‘IMAGE ID’.
$ docker images
Run a docker container
Here, we run the docker container from the above docker image. The command format is as follows.
$ docker run -it -p 8888:8888 -v ~/mounted_to_docker/:/work (IMAGE ID)
'-p 8888:8888':
-> Allows the port, whose number is 8888, in a docker container

'-v ~/mounted_to_docker/:/work':
->Synchronizes the local directory you specified('~/mounted_to_docker/') with the directory in the container('/work').
When the docker container was successfully running, you can access a jupyterlab in your web browser. The URL appears in your terminal.
Your local directory ‘~/mounted_to_docker/’ is mounted to the working directory ‘/work’ in the container.
Congratulation!! You have prepared the environment for PyCaret.
In this post, we will learn how to build a docker container for streamlit.
We create a docker image from a Dockerfile. And, we will see how to construct and run a docker container, and build a web app on its container.
Dockerfile
The entire contents of the Dockerfile are as follows.
FROM python:3.9

WORKDIR /opt
RUN pip install --upgrade pip
RUN pip install numpy==1.21.0 \
				pandas==1.3.0 \
				scikit-learn==0.24.2 \
				matplotlib==3.4.2 \
				seaborn==0.11.1 \
				plotly==5.1.0 \
				streamlit==0.84.1

WORKDIR /work
We create the docker image based on the python image, whose version is 3.9. Of course, we can specify the version in more detail, such as “FROM python:3.9.2” in the first sentence.
By the sentence “WORKDIR /opt”, we specify the directory for installing the python libraries.
And, we upgrade pip, to install the external python libraries in order. In addition to streamlit, to make things easier later, we also install numpy, pandas, scikit-learn, matplotlib, seaborn, and plotly.
Note that the last sentence ‘WORKDIR /work’ indicates that the current directory is set at ‘/work/’ after we enter the docker container.
Build a Dockerfile
Let’s create a docker image from the Dockerfile. Execute the following command in the directory where the Dockerfile exists.
$ docker build .
After building the docker image, you can confirm the result by the following command. Later, we will use the ‘IMAGE ID’.
$ docker images
Run a docker container
Here, we run the docker container from the above docker image. The command format is as follows.
$ docker run -it -p 8888:8888 -v ~/mounted_to_docker/:/work <IMAGE ID> bash

'-p 8888:8888':
-> Allows the port, whose number is 8888, in a docker container

'-v ~/mounted_to_docker/:/work':
->Synchronizes the local directory you specified('~/mounted_to_docker/') with the directory in the container('/work').
$ docker run -it -p 8888:8888 -v ~/mounted_to_docker/:/work 8316e8947747 bash
When the docker container was successfully running, you would be in the container.
Your local directory ‘~/mounted_to_docker/’ is mounted to the working directory ‘/work’ in the container.
By the ‘ls’ command, you can check whether your local directory is mounted to the working directory in the container.
Run streamlit
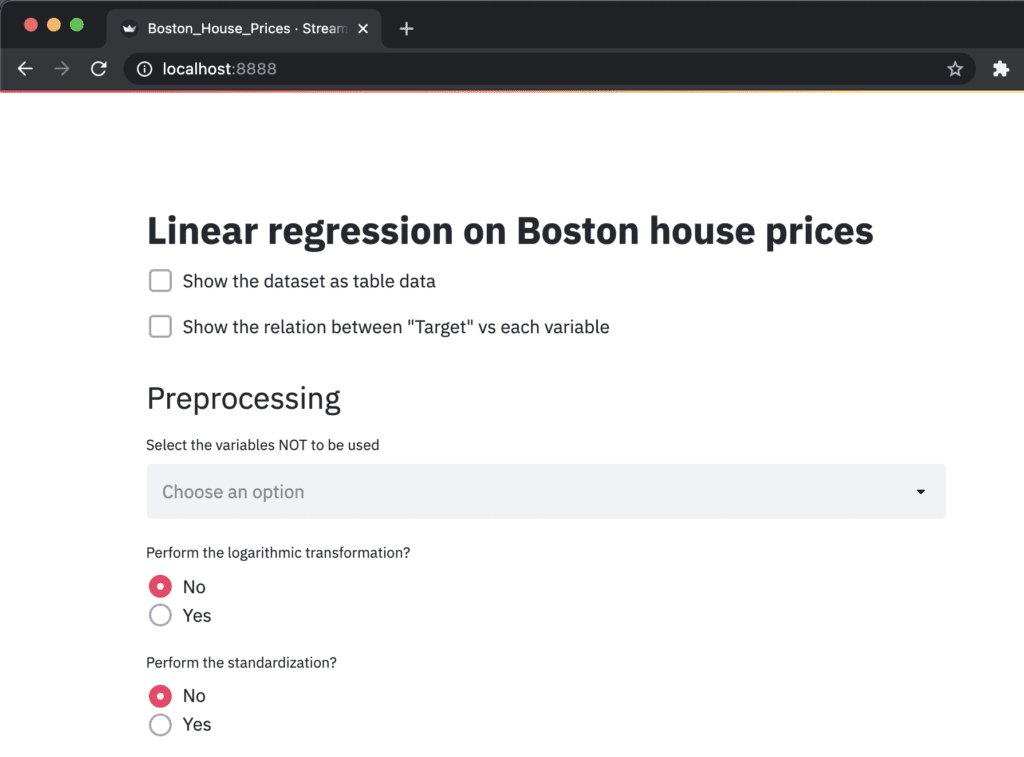
In the container, it is possible to use streamlit. You can execute your python script designed with streamlit as follows.
$ streamlit run Boston_House_Prices.py --server.port 8888
The ‘Network URL: http://172.17.0.2:8888’ is combined to ‘localhost:8888’. Therefore, you can view your web app created from ‘Boston_House_Prices.py’ at ‘localhost:8888’ in a web browser.
Congulaturation!! You have prepared the environment for using streamlit.
Example of Streamlit
At this point, you can prepare an environment for using streamlit by docker. Therefore, you can try streamlit, deploying your data analysis into a web app!
The following articles may be useful for you. You can try a regression analysis or a principal component analysis(PCA), and deploy them into a web app by streamlit.
In this short post, we construct the environment for streamlit by docker. We create a docker image from a Dockerfile. And, we will see how to construct and run a docker container, and build a web app on its container.
Dockerfile
The entire contents of the Dockerfile are as follows.
FROM python:3.8.8

RUN pip install --upgrade pip
RUN pip install streamlit==0.78.0 \
				numpy==1.20.1 \
				pandas==1.2.3 \
				matplotlib==3.3.4 \
				seaborn==0.11.1 \
				scikit-learn==0.24.1

WORKDIR /work
We create the docker image based on the python image, whose version is 3.8.8.
And, we upgrade pip, to install the external python libraries. In addition to streamlit, to make things easier later, we also install numpy, pandas, matplotlib, seaborn, and scikit-learn.
Note that the last sentense ‘WORKDIR /work’ indicates that the current directory is set at ‘/work/’ after we enter the docker container.
Build a Dockerfile
Let’s create a docker image from the Dockerfile. Execute the following command in the directory where the Dockerfile exists.
$ docker build .
After building the docker image, you can confirm the result by the following command. Later, we will use the ‘IMAGE ID’.
$ docker images
Run a docker container
Here, we run the docker container from the above docker image. The command format is as follows.
$ docker run -it -p 8888:8888 -v ~/mounted_to_docker/:/work <IMAGE ID> bash

'-p 8888:8888':
-> Allows the port, whose number is 8888, in a docker container

'-v ~/mounted_to_docker/:/work':
->Synchronizes the local directory you specified('~/mounted_to_docker/') with the directory in the container('/work').
$ docker run -it -p 8888:8888 -v ~/mounted_to_docker/:/work 8316e8947747 bash
When the docker container was successfully running, you would be in the container.
Your local directory ‘~/mounted_to_docker/’ is mounted to the working directory ‘/work’ in the container.
By the ‘ls’ command, you can check whether your local directory is mounted to the working directory in the container.
Run streamlit
In the container, it is possible to use streamlit. You can execute your python script designed with streamlit as follows.
$ streamlit run Boston_House_Prices.py --server.port 8888
The ‘Network URL: http://172.17.0.2:8888’ is combined to ‘localhost:8888’. Therefore, you can view your web app created from ‘Boston_House_Prices.py’ at ‘localhost:8888’ in a web browser.
Congulaturation!! You have prepared the environment for using strea.
Announcement
The new book for a tutorial of Streamlit has been published on Amazon Kindle, which is registered in Kindle Unlimited. Any member can read it !
However, it is possible that the PATH of the brew executable file is not in the PATH. In that case, add the following sentence to the environment setting file of shell. The shell config file is “.bashrc” if you are using bash. If you are using zsh, the config file is “.zshrc” or “.zshenv”. Note that the default shell on M1 Mac is zsh.
# Homebrew
export PATH=/opt/homebrew/bin:$PATH
Here, your PC can recognize where the brew executable file exists in the directories.
Summary
We have seen how to install Homebrew on M1 Mac. With Homebrew, we can manage applications easily. For example, we can install Git, Python and so many utility applications.
Git, a version control system, is one of the essential skills for programmers and software engineers. Especially, GitHub, a version control service based on Git, is becoming the standard skill for such engineers.
GitHub is a famous service to control the version of a software development project. At GitHub, you can host your repository as a web page and keep your codes there. Besides, GitHub has many rich functions and makes it easier to manage the version of codes, so it is so practical for a large-scale project management. However, on the other hand, personal use is a little higher for beginners because of its peculiarity concepts, such as “commit” and “push”.
In this post, we will see the basic usage of GitHub, especially the process of creating a new repository and pushing your codes. It is intended for beginners. And after reading this post, you will keep your codes at GitHub, making your work more efficient.
What is GitHub?
Git, a core system for GitHub, is an open-source tool to control the version of a system. Especially, the function of tracking changes among versions is so useful, making it easier to run a software development project as a team.
GitHub is a well-known service using Git. Roughly speaking, GitHub is a platform to manage our codes and utilize the codes someone has written. We can manage not only individual codes but also open-source projects. Therefore, many open-source projects in the world are published through GitHub. The Python library you are using may also be published through GitHub.
The basic concept of GitHub is to synchronize the repository, like a directory including your codes, between your PC and the GitHub server. The feature is that we synchronize not only the code but also the change records. This is why GitHub is a powerful tool for developing as a team.
Try Git
First of all, if you have NOT installed Git, you have to install it. Please refer to the Git official site.
When Git is successfully installed, you can see the following message after the execution of the “git” command on the terminal or the command prompt.
git

>>  usage: git [--version] [--help] [-C <path>] [-c <name>=<value>]
>>             [--exec-path[=<path>]] [--html-path] [--man-path] [--info-path]
>>             [-p | --paginate | -P | --no-pager] [--no-replace-objects] [--bare]
>>             [--git-dir=<path>] [--work-tree=<path>] [--namespace=<name>]
>>             <command> [<args>]
>>
>>  These are common Git commands used in various situations:
>>  ...
>>  ...
Git command
Here, we will use the Git command. The basic format is “git @@@”, where “@@@” is each command such as “clone” and “add”. In this article, we will use just 5 commands as follows.
For personal use, these five commands are all you need. Each command wii be explained below.
Create a New Repository
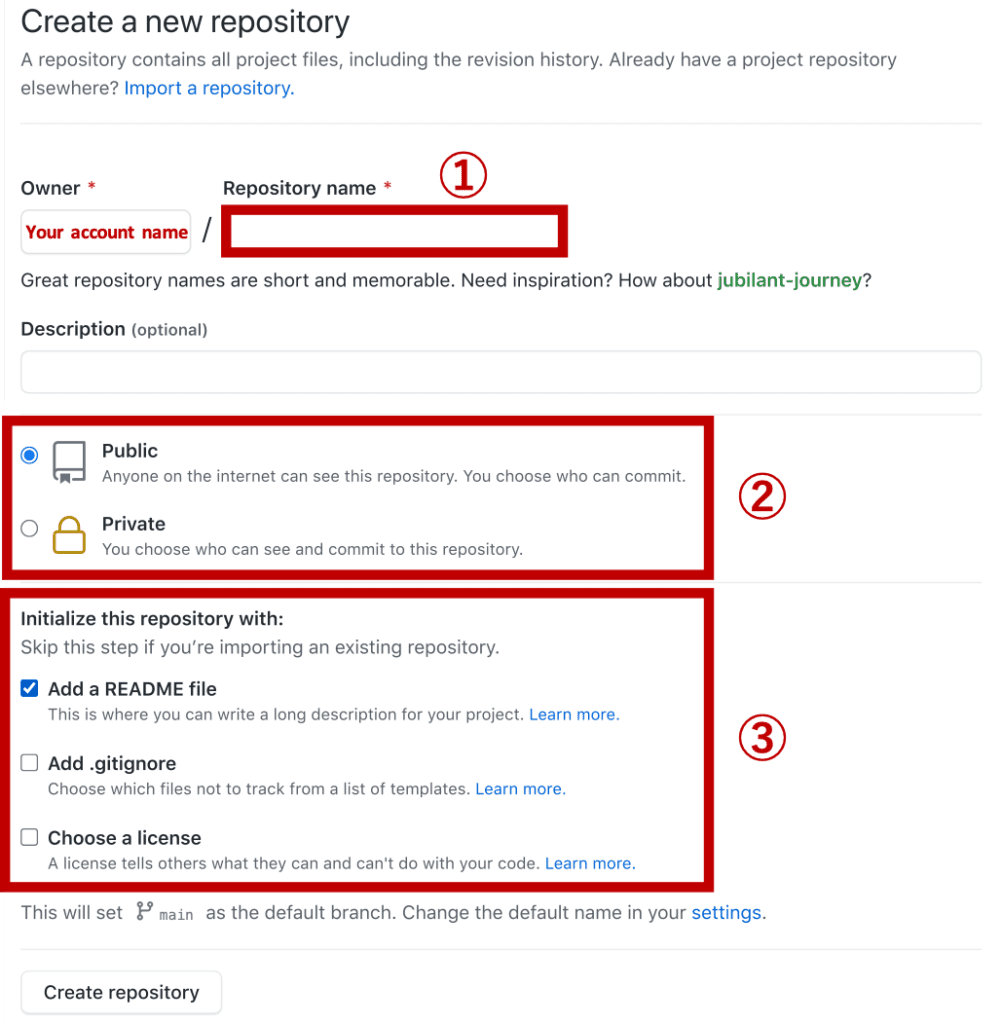
First, you create a new repository for your project. A repository is like a folder of your codes. It is easy to create a new repository on your GitHub account.
1. You visit the GitHub site and log in to your account. If you don’t have your account, please create.
2. Go to the ①“Repositories” tab, and click the ②“New” button.
3. Fill in the necessary information, “①Repository name”, “②Public or Private”, and “③Initialized files”.
Note that, in”Public or Private” at ②, “Private” is for paid members. If it’s okay to publish it worldwide like a web page, select “Public”.
Whether you check “Add a README file” depends on you. The “README” file is for the description of your project. Of course, you can manually add the “README” file later.
Clone the Repository
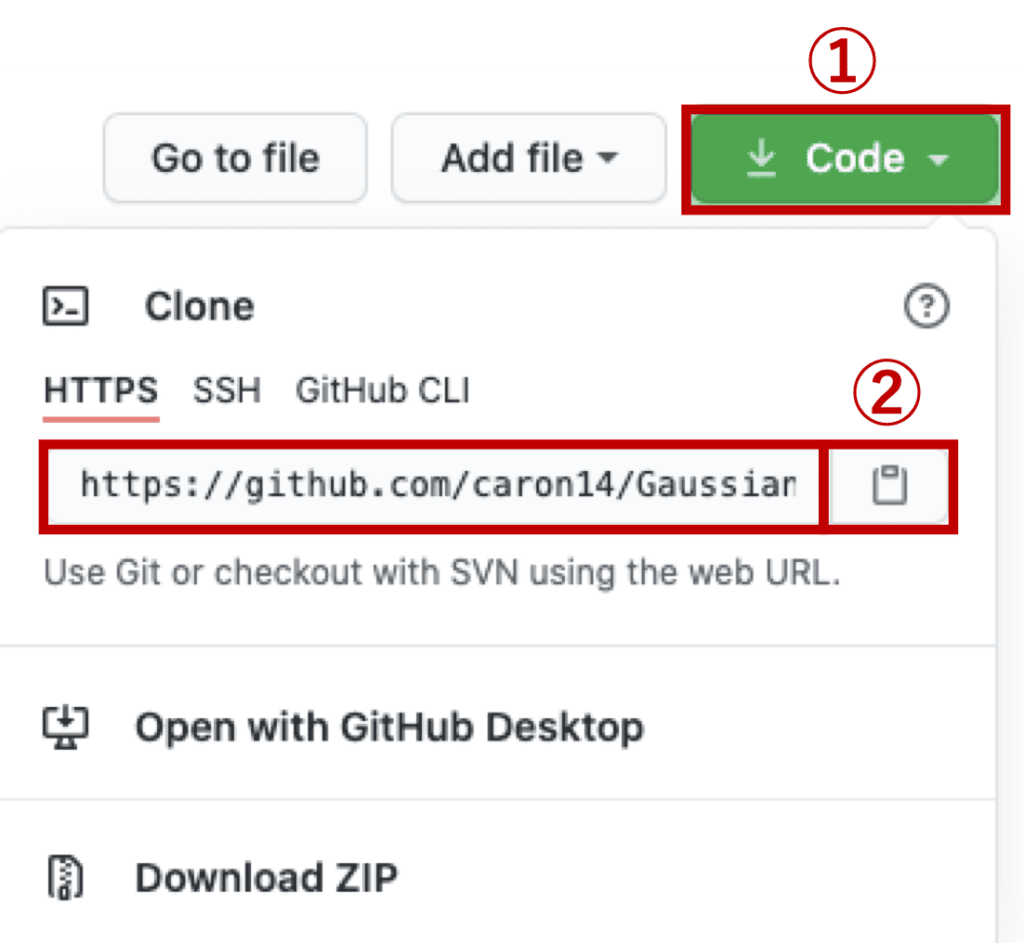
The “clone” command synchronizes the local repository at your PC with the repository at GitHub. You can clone with just only the URL of your repository at GitHub.
1. Click the green button of “Code”(①).
2. Copy the URL of the HTTPS tab. You can copy by clicking the log at ②. Note that the default setting is for the HTTPS tab.
3. Execute the following command at the working directory on your terminal.
git clone <URL>
When the clone is done successfully, the directory, whose name is the same as the repository name, has been created. The version history of the repository is stored in the “.git” directory. “.git” is the hidden directory, so you can’t see it on your terminal by the “ls” command. You have to use the “ls -a” command. “-a” is the option for hidden files and directories.
Confirm the “Status”
First of all, we have to specify the files to synchronize with the repository on GitHub. Create a new script “sample.py” on the directory you cloned. For example, we can create it with the “touch” command.
touch sample.py
Next, use the “git add” command to put the target file in the staging state. Before executing the “git add” command, let’s confirm the staging condition of the file by the “git status” command.
git status

>>  On branch master
>>  Your branch is up to date with 'origin/master'.
>>
>>  Untracked files:
>>    (use "git add <file>..." to include in what will be committed)
>>
>>  	sample.py
>>
>>  nothing added to commit but untracked files present (use "git add" to track)
“Untracked files:” indicates “sample.py” is a new file. Note that the file is NOT staged yet, so the display of color is with red, “sample.py“. Next, let’s change the status of “sample.py”. We will see the color of “sample.py” will change.
Change the “Status”
We change the status of the file by the “git add” command and check the status again by the “git status” command.
git add sample.py
git status

>>  On branch master
>>  Your branch is up to date with 'origin/master'.
>>
>>  Changes to be committed:
>>    (use "git reset HEAD <file>..." to unstage)
>>
>>  	new file:   sample.py
>>
Git recognized “sample.py” as a new file!
And We have seen the change of color. The display “sample.py” of color has been changed from red to green. The green indicates that the file is now staged!
Note that you can cancel the “git status” command against “sample.py”. After the following command, you will see that “sample.py” was unstaged.
git reset sample.py
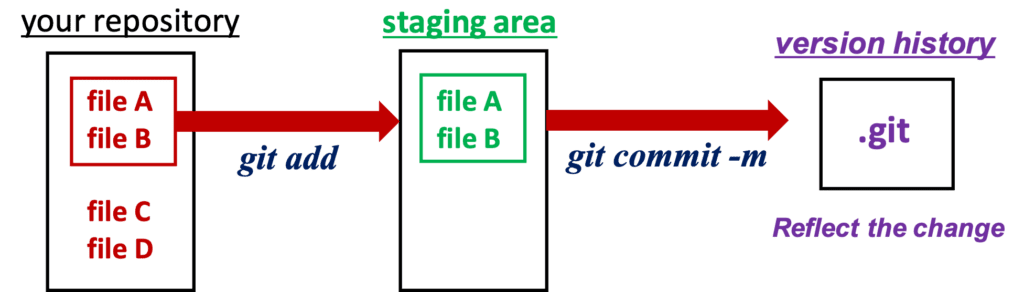
Why is the staging need?
The beginners may be unfamiliar with the concept of “staging”. Why is the staging need? The answer is to prepare for committing. Git reflects the change of a file into the version history when committing. To distinguish the files to commit, Git specifies the files clearly by the “git add” command.
“Commit” the staging files
Next, we will reflect the changes of the staged file to the local repository. This operation is called “commit”. The command is as follows.
git commit -m "This is comment."
“-m” is the option for a comment. The comment makes it possible to understand what is the intention for the change of the code.
The concept of “commit” might be unfamiliar to beginners. Why the commit is need? At the commit stage, Git does NOT reflect the modified files to the GitHub repository but to your local repository. Therefore, when developing as a team, you don’t have to worry about your modification conflicting with your teammate’s modification. At the stage of “push”, your modification of files and the version history are synchronized with the GitHub repository. This is why your teammates can distinguish your changes from those of other people!
“Push” the commited files
The final step is to synchronize your local repository with your GitHub repository. This operation is called “push”. After the “git push” command, the committed changes will be reflected in your GitHub repository.
The command is as follows.
git push
If successfully done, you can confirm on your GitHub web page that your new file “sample.py” exists in your GitHub repository.
Congratulations! This is the main flow of managing files on GitHub.
When you modified the file
From the above, we can see how to add a new file. Here, we have seen the modified file case.
Please add the something change to “sample.py”. Then, execute the “git status” command. You will see Git recognizes the file was modified.
The file is NOT staged yet, so the display of color is with red, “sample.py“.
git status

>>  On branch master
>>  Your branch is up to date with 'origin/master'.
>>
>>  Changes not staged for commit:
>>    (use "git add <file>..." to update what will be committed)
>>    (use "git checkout -- <file>..." to discard changes in working directory)
>>
>>  	modified:   sample.py
>>
The difference is only the above. From here, you do just as you’ve seen.
git add
git commit -m
git push
Summary
We have learned the basic GitHub skill. As a data scientist, GitHub skill is one of the essential skills, in addition to programming skills. GitHub not only makes it easier to manage the version of codes but also gives you opportunities to interact with other programmers.
GitHub has many code sources and knowledge. Why not use GitHub. You can get a chance to utilize the knowledge of great programmers from around the world.