Step-by-step guide of Decision Tree Regression for Boston House Prices dataset

The famous machine learning algorithms, such as Random Forest and Gradient Boosting Decision Trees(GBDT), are based on the decision tree method. Therefore, it is a good choice to start by learning a decision tree method.

In this post, we will see a brief description of the decision tree method and the sample code. We will apply a regression analysis of the decision tree method to the Boston house prices dataset.

What is a decision tree method?

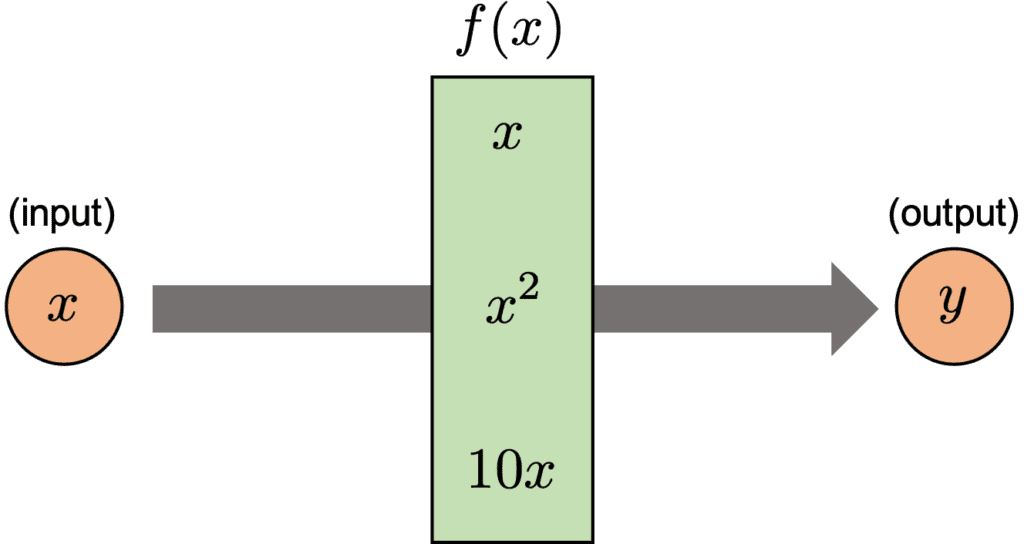
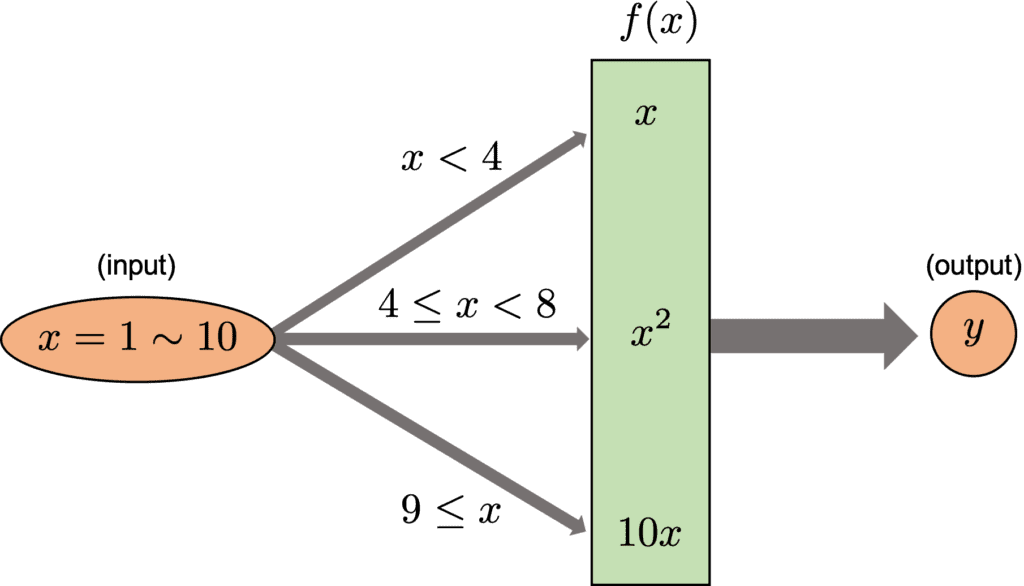
The decision tree is a method of predicting by repeating the case classification of input information. It is recognized as a convenient technique because it can be used for both regression and classification problems.

The model created by a decision tree method becomes more expressive as the number of conditional branches increases. On the other hand, it can be overfitting to the training data, taking into account non-essential conditional branches.

From here, let’s apply a decision tree method to the regression problem.

Load the Dataset

In this post, we use the Boston house prices dataset in the scikit-learn library. We can easily load the dataset by just two lines below.

from sklearn.datasets import load_boston
dataset = load_boston()

The details of the Boston house prices dataset, an exploratory data analysis, is introduced in another post.

Read the Dataset as Pandas DataFrame

import pandas as pd

f = pd.DataFrame(dataset.data)
f.columns = dataset.feature_names
f["PRICES"] = dataset.target
f.head()

Example: RM vs PRICES

Let’s try to check the correlation between only “PRICES” and “RM”.

import matplotlib.pylab as plt  #-- "Matplotlib" for Plotting

f.plot(x="RM", y="PRICES", style="o")
plt.ylabel("PRICES")
plt.show()

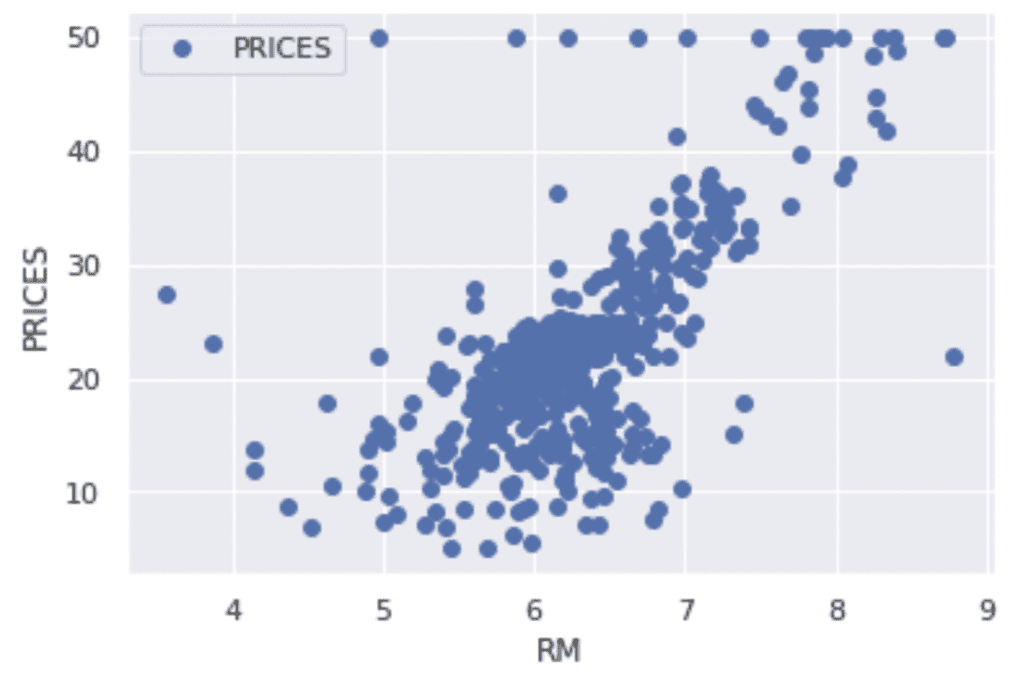
Variables to be used

TargetName = "PRICES"
FeaturesName = [\
              #-- "Crime occurrence rate per unit population by town"
              "CRIM",\
              #-- "Percentage of 25000-squared-feet-area house"
              'ZN',\
              #-- "Percentage of non-retail land area by town"
              'INDUS',\
              #-- "Index for Charlse river: 0 is near, 1 is far"
              'CHAS',\
              #-- "Nitrogen compound concentration"
              'NOX',\
              #-- "Average number of rooms per residence"
              'RM',\
              #-- "Percentage of buildings built before 1940"
              'AGE',\
              #-- 'Weighted distance from five employment centers'
              "DIS",\
              ##-- "Index for easy access to highway"
              'RAD',\
              ##-- "Tax rate per $100,000"
              'TAX',\
              ##-- "Percentage of students and teachers in each town"
              'PTRATIO',\
              ##-- "1000(Bk - 0.63)^2, where Bk is the percentage of Black people"
              'B',\
              ##-- "Percentage of low-class population"
              'LSTAT',\
              ]

We prepare the input and target variables as “X” and “Y”.

X = f[FeaturesName]
Y = f[TargetName]

No need to perform standardization

We don’t need to standardize or normalize the numerical variable in a decision tree analysis. This is because the decision tree classifies the cases by focusing only on the magnitude relationship of the values. Therefore, the difference in the scale of the variables does NOT affect the final result.

Split the Dataset

To validate the performance of the trained model against unseen data, we have to split the dataset into the train data and the test data.

We pass the dataset “(X, Y)” to the “train_test_split()” function. The rate of the train data and the test data is defined by the argument “test_size”. Here, the rate is set to be “8:2”. And, “random_state” is set for reproducibility. You can use any number.

from sklearn.model_selection import train_test_split
X_train, X_test, Y_train, Y_test = train_test_split(X, Y, test_size=0.2, random_state=99)

Create a model instance

We create a decision-tree instance and pass the training dataset to it.

# Fitting Decision Tree Regression to the dataset
from sklearn.tree import DecisionTreeRegressor
regressor = DecisionTreeRegressor()
regressor.fit(X_train, Y_train)

Validation

To validate the performance of the model, we predict the training and validation data.

y_pred_train = regressor.predict(X_train)
y_pred_test = regressor.predict(X_test)

Then, let’s visualize the result by matplotlib.

import seaborn as sns

plt.figure(figsize=(5, 5), dpi=100)
sns.set()
plt.xlabel("PRICES")
plt.ylabel("Predicted PRICES")
plt.xlim(0, 60)
plt.ylim(0, 60)
plt.scatter(Y_train, y_pred_train, lw=1, color="r", label="train data")
plt.scatter(Y_test, y_pred_test, lw=1, color="b", label="test data")
plt.legend()
plt.show()

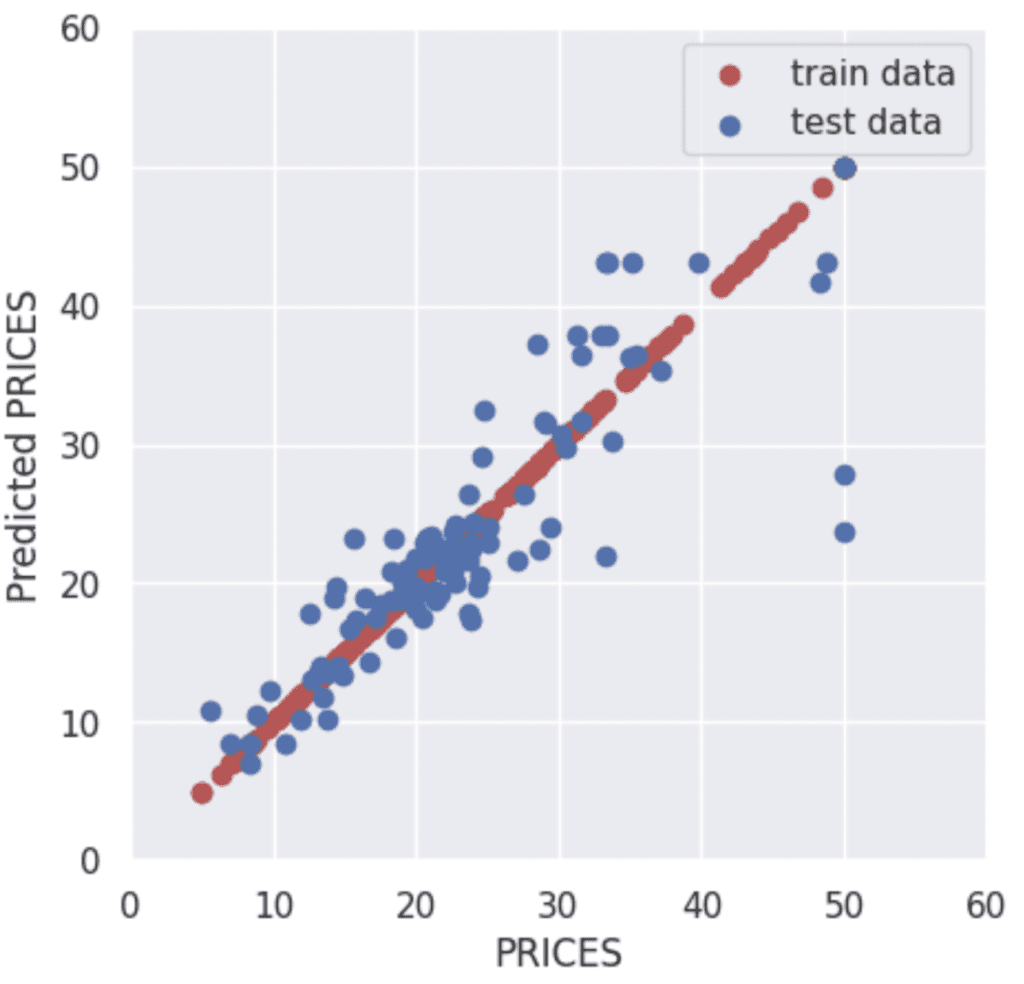
The red and blue circles show the results of the training and validation data, respectively.

To confirm the prediction accuracy of the verification data, we check $R^{2}$ score, the coefficient of determination. $R^{2}$ is the index for how much the model is fitted to the dataset. When $R^{2}$ is close to $1$, the model accuracy is good. Conversely, when $R^{2}$ approaches $0$, it means that the model accuracy is poor.

We can calculate $R^{2}$ by the “r2_score()” function in scikit-learn.

from sklearn.metrics import r2_score
R2 = r2_score(Y_test, y_pred_test)
R2

>>  0.7368516281144417

The score $0.74$ is not bad.

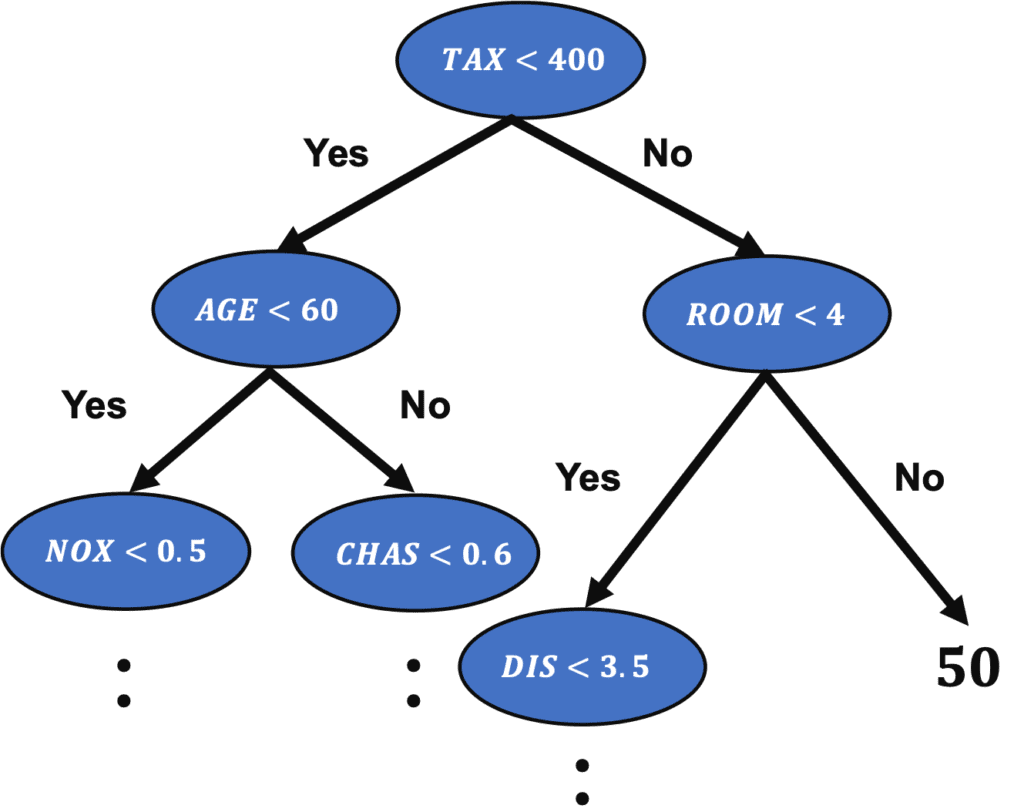
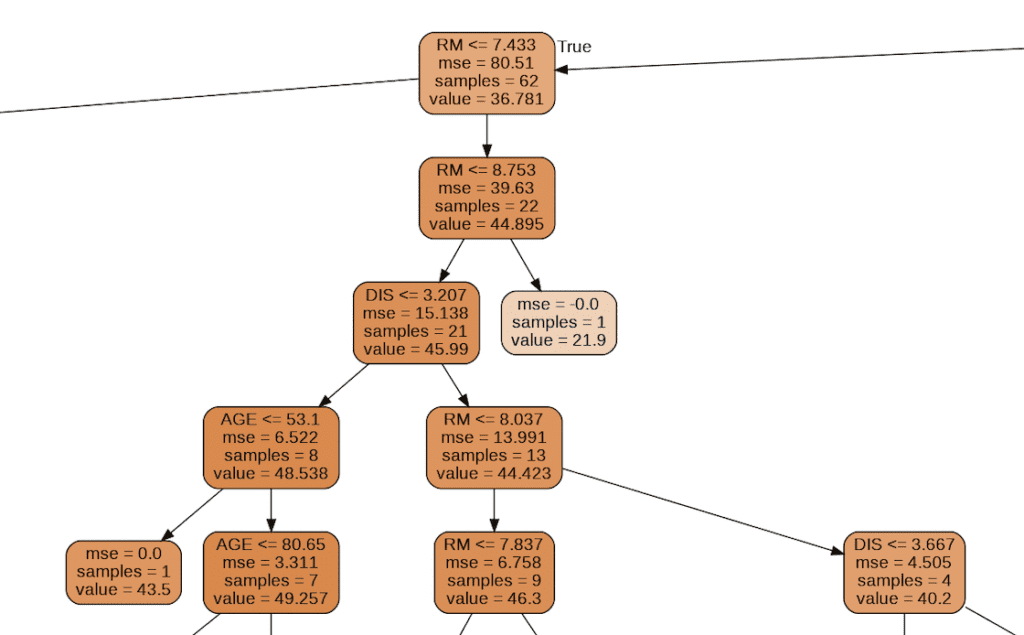
Visualization of Tree Structure

We can check the tree structure of the model.

from sklearn.tree import export_graphviz
import pydotplus
from IPython.display import Image
export_graphviz(regressor, out_file="tree-structure.dot", feature_names=X_train.columns, filled=True, rounded=True)
g = pydotplus.graph_from_dot_file(path="tree-structure.dot")
Image(g.create_png())

Summary

We have seen the decision tree analysis against the Boston house prices dataset. In the case of one decision tree model, the accuracy of the validation data is a little worse than the accuracy of the training data. One way to improve accuracy is to use the mean values predicted by multiple models. This is called an ensemble. In the decision tree model base, this ensemble method is called Random Forest and can be easily implemented.

The author hopes this blog helps readers a little.

Prediction of Diabetes Progression by PyCaret, Regression Analysis

In this post, we will learn the tutorial of PyCaret from the regression problem; prediction of diabetes progression. PyCaret is so useful especially when you start to tackle a machine learning problem such as regression and classification problems. This is because PyCaret makes it easy to perform preprocessing, comparing models, hyperparameter tuning, and prediction.

Requirement

PyCaret is now highly developed, so you should check the version of the library.

pycaret == 2.2.3
pandas == 1.1.5
scikit-learn == 0.23.2
matplotlib == 3.2.2

If you have NOT installed PyCaret yet, you can easily install it by the following command on your terminal or command prompt.

$pip install pycaret

Or you can specify the version of PyCaret.

$pip install pycaret==2.2.3

From here, the sample code in this post is supposed to run on Jupyter Notebook.

Import Library

##-- PyCaret
import pycaret
from pycaret.regression import *
##-- Pandas
import pandas as pd
from pandas import Series, DataFrame
##-- Scikit-learn
import sklearn

Load dataset

In this post, we use “the diabetes dataset” from scikit-learn library. This dataset is easy to use because we can load this dataset from the scikit-learn library, NOT from the external file.

We will predict a quantitative measure of diabetes progression one year after baseline. So, the target variable is diabetes progression in “dataset.target“. And, there are ten explanatory variables (age, sex, body mass index, average blood pressure, and six blood serum measurements).

First, load the dataset from “load_diabetes()” as “dataset”. And, for convenience, convert the dataset into the pandas-DataFrame form.

from sklearn.datasets import load_diabetes
dataset = load_diabetes()

df = pd.DataFrame(dataset.data)

It should be noted that we can confirm the description of the dataset.

print(dataset.DESCR)

An excerpt of the explanation of the explanatory variables is as follows.

:Attribute Information:
    - age     age in years
    - sex
    - bmi     body mass index
    - bp      average blood pressure
    - s1      tc, T-Cells (a type of white blood cells)
    - s2      ldl, low-density lipoproteins
    - s3      hdl, high-density lipoproteins
    - s4      tch, thyroid stimulating hormone
    - s5      ltg, lamotrigine
    - s6      glu, blood sugar level    

Then, we assign the above names of the columns to the data frame of pandas. And, we create the “target” column, i.s., the prediction target, and assign the supervised values.

df.columns = dataset.feature_names
df["target"] = dataset.target
df.head()

Here, we devide the dataset into train- and test- datasets, making it possible to check the ability of the trained model against an unseen data. We split the dataset into train and test datasets, as 8:2.

split_rate = 0.8
data = df.iloc[ : int(split_rate*len(df)), :]
data_pre = df.iloc[ int(split_rate*len(df)) :, :]

Set up the environment by the “setup()” function

PyCaret needs to initialize an environment by the “setup()” function. Conveniently, PyCaret infers the data type of the variables in the dataset. Due to regression analysis, let’s leave only the numerical data. Namely, we delete the categorical variables. This approach would be practical as a first analysis to understand the dataset.

Arguments of setup() are the dataset as Pandas DataFrame, the target-column name, and the “session_id”. The “session_id” equals a random seed.

model = setup(data = data, target = "target", session_id=99)

PyCaret told us that just “sex” is a categorical variable. Then, we drop its columns and reset up.

data = data.drop('sex', 1) # "1" indicate the columns.
model = setup(data = data, target = "target", session_id=99)

Compare models

We can easily compare models between different machine-learning methods. It is so practical just to know which is more effective, the regression model or the decision tree model.

compare_models()

As the above results, the br(Bayesian Ridge) and lr(Linear Regression) have the highest accuracies in the above models. In general, there is a tendency that a decision tree method realizes a higher accuracy than that of a regression method. However, from the viewpoint of model interpretability, the regression method is more effective than the decision tree method, especially when the accuracy is almost the same. Regression analysis tends to be easy to provide insight into the dataset.

Due to the simplicity of the technique and the interpretability of the model, we will adopt lr(Linear Regression) for the models that will be used below. The details of the linear regression technique are described in another post below.

Select and Create the model

We can create the selected model by create_model() with the argument of “lr”. Another argument of “fold” is the number of cross-validation. “fold = 4” indicates we split the dataset into four and train the model in each dataset separately.

lr = create_model("lr", fold=4)

Optimize Hyperparameters

PyCaret makes it possible to optimize the hyperparameters. Just you pass the object cerated by create_model() to tune_model(). Note that optimization is done by the random grid-search technique.

Predict the test data

Let’s predict the test data by the above model. We can do it easily with just one sentence.

predictions = predict_model(tuned_model, data=data_pre)
predictions.head()

The added column, “Label”, is the predicted values. Besides, we can confirm the famous metric, such as $R^2$.

from pycaret.utils import check_metric
check_metric(predictions["target"], predictions["Label"], 'R2')

>>  0.535

Visualization

It is also easy to visualize the results.

plot_model(tuned_model, plot = 'error')

Note that, without an argument, a residual plot will be visualized.

plot_model(tuned_model)

Summary

We have seen the tutorial of PyCaret from the regression problem. PyCaret is so useful to perform the first analysis against the unknown dataset.

In data science, it is important to try various approaches and to repeat small trials quickly. Therefore, there might be worth using PyCaret to do such thing more efficiently.

The author hopes this blog helps readers a little.

Python for Beginners ~ Part 3 ~

This post is the next post of Part 1 and 2. A series of posts is intended to see the basics of Python.

The following contents were already introduced in the previous posts, Part 1 and 2.

  • variables
  • comment
  • arithmetic operations
  • boolean
  • comparison operator
  • list
  • dictionary
  • if statement
  • for loop
  • function

In this Part 3, we will learn the following contents.

  • object
  • class
  • instance

Note) The sample code in this post is supposed to run on Jupyter Notebook.

object

Python is an object-oriented programming language. An object-oriented style makes it possible to write a more readable and flexible code. Therefore, to understand the concept of an object is highly important.

However, as we have seen in Part 1 and 2, an object-oriented style doesn’t appear. But, it is just Python has hidden object orientation. But from here on, let’s take advantage of object-orientation and take it one step further. This will make your code more functional and maintainable.

Everything that Python deals with is an object. For example, variables, list, function, ..etc. An object is often likened to a thing. In Python, we call a concrete object an instance. The concept of an instance is unfamiliar to beginners. However, please note that it is needed especially when creating a machine learning model.

Example to understand object

Let’s imagine an object with some examples.

First, how about the variable $x$, whose value is $1$.

x = 1
x

>>  1

You may be thinking that $x$ is a variable with the value of $1$. Or, $x$ equals $1$. However, recall the following fact.

type(x)

>>  int

Actually, the variable $x$ has a value of $1$ and the information of data type of “int. We don’t usually think about the above. However, $x$ is a variable object that has value and data-type information.

We’re not aware of it because we just gave $x$ a value of $1$. But, in behind, Python also gives variable attribute information.

Next, let’s see another example of list.

a = [1, 2, 3]
type(a)

>>  list

The list $a$ has the values of [1, 2, 3] and the information of list. Here, please recall that we can add new element by the append() method.

a.append(10)
a

>>  [1, 2, 3, 10]

When be aware of object, the list object $a$ has the method append() and we called it by $a$.append(). In other words, the append() method was originally included in the list object $a$. The list object has values, information of data type, and functions.

Short summary of object

Could you have imagined an object from the above example? An object is a thing including values, information, and functions. Note that variables, lists, functions, etc. are objects that Python has as standard. We were unknowingly calling and using it.

From here, you will create your own objects with a next topic called class”. Especially, when creating a machine learning model, we need to create our original object by class(). This is due to designing machine learning models by giving the objects model structure, training, and predictive functions.

class

Here, let’s create our own object by class. The sample code is below. We define a class by “class (class name)”. In the following, we created the class “MyClass()”. And, “__init__()” is for initializing an argument $x$ when we create an instance from the class. Although it is unfamiliar to beginners, a function in class must receive the own argument “self”, which is just an object itself. Then, each function in the class also receives “self”, making it possible to use the variables(self.x) and the functions(func1, func2, func3).

class MyClass():
  def __init__(self, x):
    self.x = x
  
  # f(x) = x
  def func1(self):
    return self.x

  # f(x) = x^2
  def func2(self):
    return self.x*self.x

  # f(x) = 10*x
  def func3(self):
    return 10*self.x

instance

An instance is a thing created from a class. Here, let’s create an instance with name of “instance” from the class “MyClass()”.

x = 5
instance = MyClass(x)

This instance has three functions(func1, func2, func3) defined in “MyClass()”. These functions can be called in the form of methods.

instance.func1()  # f(x) = x
>>  5

instance.func2()  # f(x) = x^2
>>  25

instance.func3()  # f(x) = 10*x
>>  50

Here, the “__call__()” method is introduced. This method is called without the form of “.method()”. Let’s take the following example. The shaded area is where “__call__()” was added.

class MyClass_updated():
  def __init__(self, x):
    self.x = x

  def __call__(self):
    if self.x < 4:
      return self.func1()
    elif self.x < 8:
      return self.func2()
    else:
      return self.func3()
  
  def func1(self):
    return self.x

  def func2(self):
    return self.x*self.x
    
  def func3(self):
    return 10*self.x

Then, create an instance from the class “MyClass_updated()” and call the instance. The point is that the “__call__()” is called at “instance()”.

x = 5
instance = MyClass_updated(x)
instance()  # __call__() is called

>>  25

At this point, we can convert $x$, which will vary from $1$ to $10$ in order, with the function $f(x)$. Note that $f(x)$ changes dependent on the range of $x$, whose conditional branching is shown in the figure below.

for x in range(1, 11):
  instance = MyClass_updated(x)
  print( instance() )  # __call__() is called

>>  1
>>  2
>>  3
>>  16
>>  25
>>  36
>>  49
>>  80
>>  90
>>  100

Summary

We have seen an object, class, and instance in Python. These topic may be unfamiliar to beginners. However, these are important especially for a data scientist. The basics of Python are covered in the series of posts of Part 1 – 3.

The next step is to learn the external Python library, such as NumPy, Pandas, and scikit-learn, for data science and machine learning. By calling these libraries from Python, you can take advantage of various functions. For example, NumPy makes it easier to perform numerical calculations. Pandas is useful for the treatment of table data. And, we can create a machine-learning model with low-codes by using scikit-learn.

Note that what you call from an external library is just a class someone created. You have already basic knowledge. And you can also create your own external library.

The author hopes this blog helps readers a little.

Python for Beginners ~ Part 2 ~

This post is the next post of Part 1.

A series of posts is intended to see the basics of Python. In the previous post, the following contents were introduced.

  • Variables
  • Comment “#”
  • Arithmetic operations
  • Boolean
  • Comparison operator
  • List

In this post, we will learn the following contents.

  • dictionary
  • if statement
  • for loop
  • function
  • instance
  • class

Note) The sample code in this post is supposed to run on Jupyter Notebook.

dictionary

A dictionary stores pairs of “key” and “value”. We can access the “value” of an element by the “key”.

Here, let’s see the example of a dictionary, which stores fruit names and their numbers. A dictionary is defined by “{ }”. However, when we access the value of the dictionary, we use “[ ]” whose argument is its key.

dic_fruit = {"apple":1, "orange":3, "grape":5}
dic_fruit["grape"]

>>  5

When we pass a key that is NOT included in a dictionary, Python returns the error, where “nut” does NOT exist in the dictionary “dic_fruit”.

dic_fruit["nut"]  # dic_fruit = {"apple":1, "orange":3, "grape":5}

>>  ---------------------------------------------------------------------------
>>  KeyError                                  Traceback (most recent call last)
>>  <ipython-input-11-2c89a279e528> in <module>()
>>  ----> 1 dic_fruit["nut"]
>>  
>>  KeyError: 'nut'

It is easy to add a new element as follows.

dic_fruit["nut"] = 100
print(dic_fruit)

>>  {'apple': 1, 'orange': 3, 'grape': 5, 'nut': 100}

The element of “nut” was added.

if statement

“if statement” is for a conditional statement, whether True or False. For example, if x is greater than zero, output “x > 0”. On the other hand, if x is less than zero, output “x < 0”. In Python, the above conditional statements are written as follows.

x = 5

if x > 0:
  print( "x > 0" )
elif x < 0:
  print( "x < 0" )
else:
  print( "x = 0")

>>  x > 0

In the above example, when x = 5, x > 0 is True. On the other hand, x < 0 is False. Note that we sometimes forget to add the colon “:”.

How about the input of “x = 0”? You can confirm the output “x = 0”, too.

The if statement branches according to the conditions. Python runs line by line from top to bottom lines.

----------------------------------------------
# condition1, condition2 are True or False.

if condition1:
  Processing 1  # When, condition1 is True
elif condition2:
  Processing 2  # When, condition2 is True
else:
  Processing 3  # When, otherwise
----------------------------------------------

An indent is required at the beginning of the “processing” line. Python recognizes it as processing from whether an indent exists. Note that we sometimes forget to add the colon “:” at the ending of the “if condition”.

It is the same when the variable type is “str”.

x = "orange"

if x == "aplle":
  print( "x is apple." )
else:
  print( "x is NOT apple" )

>>  x is NOT apple

By if statement, we can judge whether the element is included in the list. We use the “in” and “not in” operators.

words = ["orange", "grape", "peach"]

if "apple" in words:
  print( "words includes apple." )
elif "apple" not in words:
  print( "words NOT include apple." )

>>  words NOT include apple.

The point is that the “if(elif)” part is executed when True, and the “else” part is executed when the above does not apply.

Python is an intuitive language so that we can easily confirm the conditions of the above example. From the following example, you can easily understand that if statement branches according to True or False.

"apple" in words  # words = ["orange", "grape", "peach"]
>>  False

"orange" in words  # words = ["orange", "grape", "peach"]
>>  True

x > 0  # x = 5
>>  True

for loop

Repeat the same operation. We use “for loop” in such a case. Here, let’s see the example of printing numbers from 0 to 4.

for i in range(5):
  print(i)

>>  0
>>  1
>>  2
>>  3
>>  4

In the “for loop”, the variable “i” changes in order from 0 to 4.

Note that, in Python, an index starts from 0. And, “range(5)” indicated the five consecutive integers starting from 0. Then, when you would like to print the values from 1 to 5, you should set them as follows.

for i in range(1, 6):
  print(i)

>>  1
>>  2
>>  3
>>  4
>>  5

If you want to skip one, the code is below.

for i in range(1, 6, 2):
  print(i)

>>  1
>>  3
>>  5

It is also possible to output the elements of the list storing the strings in order.

for name in words:  # words = ["orange", "grape", "peach"]
  print(name)

>>  orange
>>  grape
>>  peach

function

A function is like a converter. For example, we can imagine the typical mathematical function, $f(x) = x^{2}$. The $f(x)$ converts the input $x$ into the output $x^{2}$, whose image is below. And, let’s see the code of this image.

def func(x):
  return x*x

print( func(5) )

>>  25

We defined the function by “def func(x):”, whose name is “func”. And, “x” is an argument, namely an input. And, “return x*x” means this function returns the value of $x^{2}$. Of course, the return value is not always necessary. In the following example, Python just executes the command written in the function “func_print()”.

def func_print():
  print("This is a function")
  print("without a returned value.")

func_print()

>>  This is a function
>>  without a returned value.

Why we use a function? This is because we can understand a code more readable. For example, if we write a set of codes as a function of $f(x)=x^{2}$, we can recognize it as mathematical calculus. In other words, by using a function, the blueprint of your code becomes clearer.

Let’s see the following example for the above description. Here, we consider converting $x$, which will vary from 1 to 10 in order, with the function $f(x)$. Note that $f(x)$ changes dependent on the range of $x$, whose conditional branching is shown in the figure below.

First, we will see the sample code without function.

for x in range(1, 11):
  if x < 4:   # x < 4
    y = x
  elif x < 8: # 4 <= x < 8
    y = x*x
  else:
    y = 10*x  # 9 <= x
  print("x=", x, "was converted into y=", y)

>>  x= 1 was converted into y= 1
>>  x= 2 was converted into y= 2
>>  x= 3 was converted into y= 3
>>  x= 4 was converted into y= 16
>>  x= 5 was converted into y= 25
>>  x= 6 was converted into y= 36
>>  x= 7 was converted into y= 49
>>  x= 8 was converted into y= 80
>>  x= 9 was converted into y= 90
>>  x= 10 was converted into y= 100

Next, the sample code with function is below. We will see that the above code becomes more readable. Especially, it should be easier to understand what is going on in the for loop.

"""
    y = f(x)
"""
def func(x):
  if x < 4:   # x < 4
    return x
  elif x < 8: # 4 <= x < 8
    return x*x
  else:
    return 10*x  # 9 <= x


for x in range(1, 11):
  y = func(x)
  print("x=", x, "was converted into y=", y)

>>  x= 1 was converted into y= 1
>>  x= 2 was converted into y= 2
>>  x= 3 was converted into y= 3
>>  x= 4 was converted into y= 16
>>  x= 5 was converted into y= 25
>>  x= 6 was converted into y= 36
>>  x= 7 was converted into y= 49
>>  x= 8 was converted into y= 80
>>  x= 9 was converted into y= 90
>>  x= 10 was converted into y= 100

In programming, it is very important to write a script with a combination of smaller functional codes. This will make your code easier to read and maintain. In other words, the clearer the blueprint of the code, the better the code.

One more thing you need to know about a function is a local or global variable. A local variable can be accessed just in a function. On the other hand, a global variable can be accessed anytime. Besides, the information of a variable defined in a function is lost after exiting the function.

Let’s understand this explanation through an example. Try to understand how the value of “a” changes with each step.

a = 5
##-- Step 1
print("Step 1: a =", a)
>>  Step 1: a = 5


def func():
  a = 10
  ##-- Step 2
  print("Step 2: a =", a)
 
func()
>>  Step 2: a = 10


##-- Step 3
print("Step 3: a =", a)
>>  Step 3: a = 5

The above example indicates that the variables of “a” are different between outside and inside of the function “func()”.

Summary

Until here, the core syntax in Python has been introduced. In particular, the main topics (if statement, for loop, and function) are often used, so even beginners of Python should master them.

In the next post, we will try to learn more complex contents.